

If you’re not taking full advantage of all that your Google Analytics account can do for you, you’re leaving strategy-changing, business-changing insights on the table. Sure, you’ve inserted the standard tracking code and are collecting the standard data. But your business and your website are not “standard,” are they? No, you’re one of a kind! Your account should be also.
Awesome + Customize = Awesomize!
The thing about a tool like Google Analytics it has to be built to be used by ALL websites, while still supplying the capability for EACH website to use it to its fullest potential. Because this is the case, the “out-of-the-box” version of Google Analytics that you get by simply installing the analytics tracking code covers the parts that the tool does for ALL websites. But it doesn’t cover the parts that are there for YOUR website.
 [inlinetweet prefix=”” tweeter=”” suffix=””]While the “out-of-the-box” version of Google Analytics is totally awesome, there’s more awesomeness to be had that’s unique to your website and your business. [/inlinetweet]While it requires a little extra work, the payoff is huge! Because of that, it’s very important you do the extra work to customize your account. Since it’s so important, I’m going to help you get going by laying out a plethora of customization features you can (and should consider) using to make Google Analytics a better tool for your business.
I’m going to start with the features that allow you to organize your account hierarchy to create a great account structure.
Why is this so ultra-important that it had to be first? Good, accurate analysis is hard enough when data is clearly and cleanly organized. The last thing we want to do is think we’re analyzing data that has certain characteristics only to find out later (or not!) that our time was wasted coming up with “insights” and actions based on faulty data. I’ve done this more than once. I export, organize, slice, dice, draw conclusions, set forth a plan of action . . . only to realize I had a segmentation or a filter on the data that I had forgotten about. Or I had extra data included that shouldn’t be there. Not fun.
While there is no way to completely negate the possibility of making those types of mistakes, having your data organized in an optimal fashion (like a good navigation system) makes it much more likely you’ll know exactly where you are and what data you’re looking at.
Also, it’s very common that an organization wants to put good boundaries in place for people inside and outside of the organization on how their account is viewed and used. So, we’re going to start awesomizing our Google Analytics accounts by making sure we’re optimally applying the account structure features of the tool to our specific website(s), apps, etc.
Account-Level
Of course, this is the top level of the hierarchy. While you can have as many accounts as you wish, for most situations I would recommend having one account per business entity, even if your business has multiple websites. This ensures all of your data is in one place.

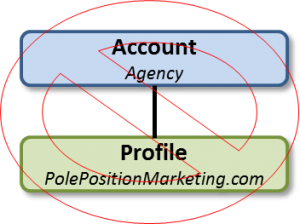
If you work with an agency, they may have their own account and house your site data under it. I’ve seen this many times, and I wouldn’t recommend this set up. As you probably know, many client/agency relationships don’t last forever. As the owner or the one responsible for the business’ data, I wouldn’t allow an agency to own the account and its data (it can’t be transferred!). Create your own account and give the agency access to it. This ensures that if/when your relationship ends, you can simply revoke the agency’s access.
Property-Level
The property level is where you segment different digital systems that you use for a specific business entity. For example, if your business has multiple websites, or a website, a mobile app and a web-based tool for clients, you would create a separate property for each under your account.
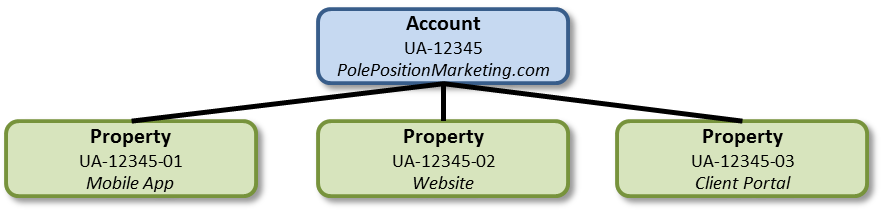
Each property contains a unique property ID that has the format UA-XXXXX-YY, where the XXXXX represents the account the property is under, and the YY represents the specific property number. The tracking code you find in each property will contain this ID and should be inserted into each system separately. This ensures the data from each system is sent to the right property.
Remember to really think about how your data fits together as you decide how to structure this. You don’t want to run into a situation where you wish you had combined specific entities together under one property. For example, if your company has a website with a blog, you don’t want to separate the website and blog into separate properties because you want all of the data from your domain to be able to be viewed together in reports.
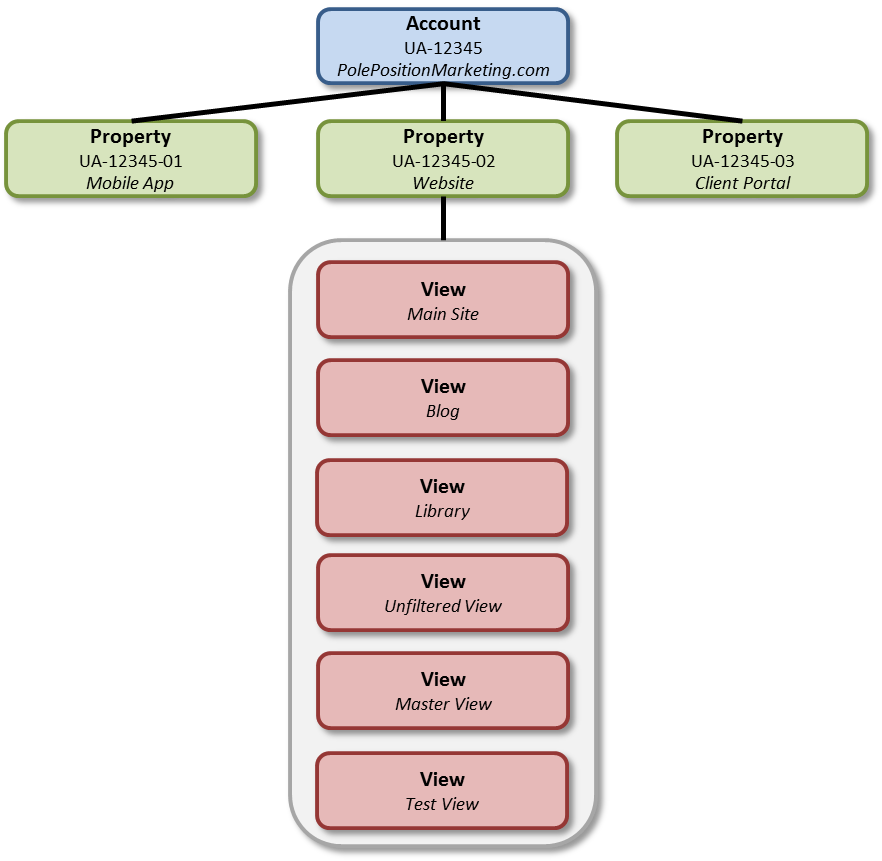
View-Level
This is the level where the data is seen. You can have multiple views in each property. The reason you would want multiple views is if anyone in your organization would consistently want specific important segments of the data from your digital system available to them by itself in reports. The reason I say “consistent” and “important” is because you don’t want to go overboard here or you’ll have so many views it will defeat the purpose of being organized.
For example, let’s say you have a business whose main source of leads come from blog content. Since this is the case, what goes on with the blog content is important. You’re going to want to consistently analyze it. So instead of jumping into a view that has ALL the data in it, you can create a new view that contains just data from the blog. The same goes if you have an important subdomain, or most of your traffic comes from PPC, or whatever applies to you. For PPM, we have 3 distinct sections of the site – the main site, the blog and the library.

Having these views allows you to not worry about segmenting your data each time you go into your account. It also helps to avoid mistakes while jumping from data set to data set.
Not only does this hierarchy allow you to keep your data organized, but it supplies the functionality to control access to the data in the ways that you want. There is user access and permissions functionality at each level of the account so you control who has access to each level and you can control the types of tasks they are allowed to perform (see below).
As a fail-safe, it’s recommended that you have at least 3 views in your account:
- Unfiltered view. This view has no specific settings applied to it. It contains all of your data unaltered from where your tracking code is placed.
- Master view. This is your main view that has all your data plus some standard customized settings like filtering out internal company traffic.
- Test view. This view is where you can first test configuration changes before applying them to other views. This ensures you know your changes are implemented correctly before altering the views that contain the data you want to stay clean for analysis.
For our account, that brings us up to 6 views under our website property…
It’s important that these are the first views you set up. This is because once you alter your data, it can’t be reprocessed. It’s altered forever. After that, you can start to map out the views that will be unique to your account given your business structure, goals and marketing activities.
Set Up Your Filters
After you’ve mapped out the views in your properties, how do you make sure the right data goes into the right views? You use what are called “view filters.” You use them to tell each view how to include, exclude or change the data from its unfiltered state in each of your specific views.
If I want a view that is dedicated specifically to our blog, I would set up a filter to include all of the traffic that comes to our domain on a page that contains /blog in the URL. Any page that does not contain /blog will be filtered out of the data and won’t show up in any reports in this specific view.
Or maybe you have the type of site that your customers login to and use your web-based software very frequently. If this is the case, you’ll want to separate the marketing section of the site from the customer section. Having data mixed together where the expectations on it are so different isn’t optimal. There would likely be no scenario where you’d want to analyze those two segments of data together.
Here’s how it looks for PPM…
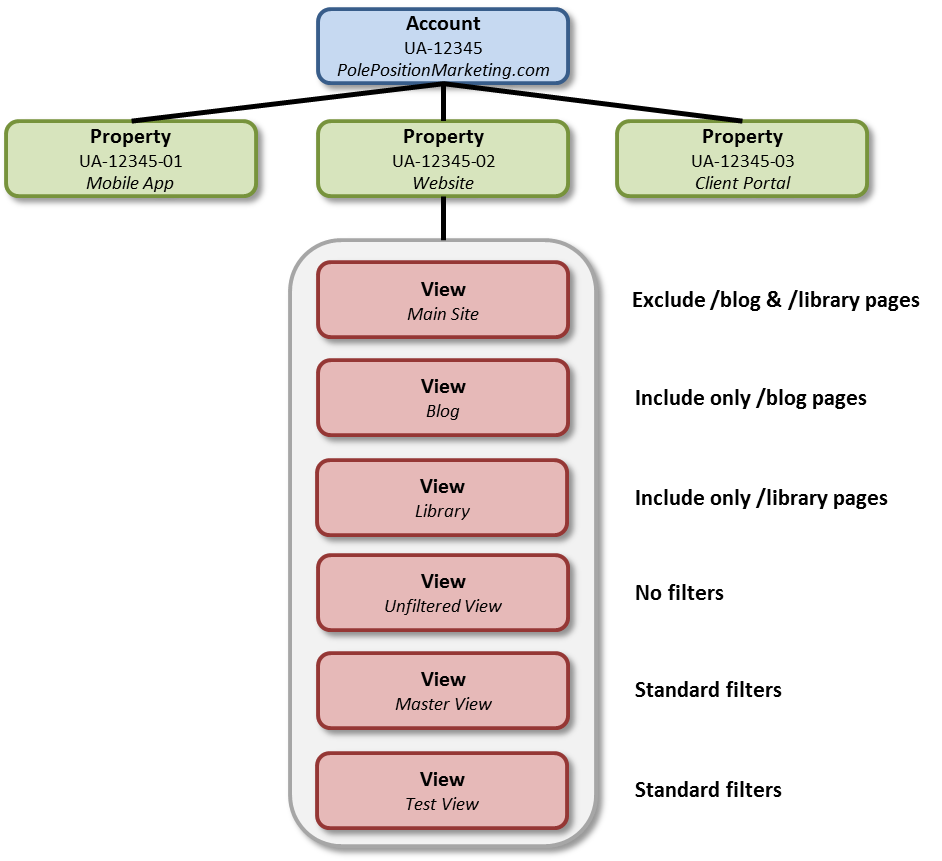
Setting up filters can get a little tricky, so make sure you have a good handle on them before setting them up.
Set Up Your User Permissions
Once you have your account structure up and data funneling into the right places, it’s time to control who has access to what data. You can do this at all three levels of your account hierarchy (account, property and view). Your decisions here rely on who you want to have access to what data and how you want them to be able to use the account.
Maybe you have multiple departments in your company and you want each department to only have access to their department’s data. Or maybe you work with an agency and you want them to have access to your website data to report, but you don’t want them changing any of the configurations. Or maybe you want your agency to make changes for you. It all depends on what you want certain people to be able to do.
There are 4 permissions you can apply, and they have specific combinations of how you can apply them:
- Manage Users. This level of access allows the user to manage other account users; meaning they can decide who has access to what and at what level. It’s not typical to give a user this type of access alone. Why would you want someone who is managing your users not be able to even see your reports? This is the level of access you would give someone who you wanted to manage your account completely.
- Edit. This allows a user to make configuration changes to your account, like customizing settings, setting up goals, etc. They cannot manage users by default, but they will also have Collaborate access with this option by default. This would be appropriate where you have someone (or an agency) that you want to have complete freedom with your account, except you don’t want them managing users.
- Collaborate. There are customizable report features of Google Analytics like dashboards, custom reports, annotations, etc. that can be specific to users. This setting allows them to use those features, share them with others and edit those that have been shared with them. This option must also include Read & Analyze by default. This is a great permission choice if you have an analyst who you want to be able to use your account to see data, create reports, etc., but you don’t want them making administrative changes with users, settings or data collection.
- Read & Analyze. This allows a user to use reports and their customizable features, as well as share them with others. But, they cannot collaborate on (edit) things that are shared with other users. This is great if you have a user who you only want to be able to look at data, but not be able to change anything. This is a great setting for CxOs (C-suite executives), believe it or not! You don’t want those guys screwing things up! 🙂
Of course, if you want someone to have total access and control over your account, you can pick all four of these. Here’s how I might configure access for some of the people at PPM:
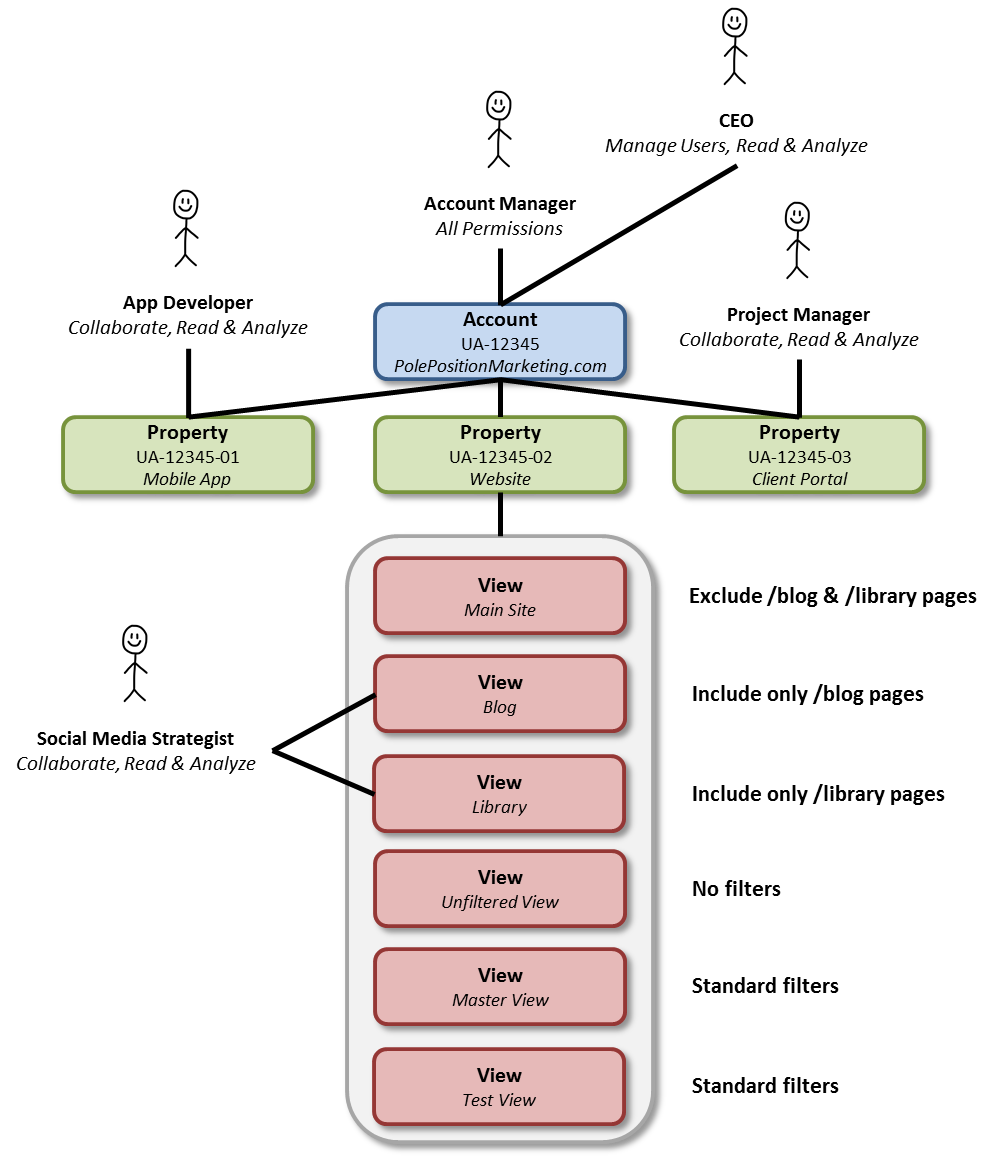
These settings are hierarchical; meaning if you set specific permissions at the account level, the user will also have those permissions at the property and view levels. But, if you set different permissions at a lower level, those will override the account level.
And there you have it. No longer will you have mish-mashes of data all in one place. That which should be separated will be. Those that only need access to certain data will have what they need without being distracted by other profiles and views. Those that might screw things up because they have power but no idea what they’re doing (like the CEO!) won’t be able to (Yay!).
You’ve taken the first step toward awesomizing your Google Analytics account. Now that your data and access is organized, it’s on to step two – Collect Site-Specific Data.