

Quoting Bill Gates, “If your business is not on the internet, then your business will be out of business.” In order to stay relevant, every business needs to have a strong online presence, along with defined objectives and strategies to attain them. If a company or a product fails to do so, it will gradually fade away from the global spectrum, leading to a business’ annihilation.
The reason why millions of businesses decide to have a website is that they can reach an extensive audience. When you have a website, you can easily monitor visitors and track actions like sign ups, downloads, and pageviews.
To comprehend and analyze visitor behavior, every online business needs a tool to monitor traffic. Fortunately, Google Analytics comes into action when we talk about tracking website traffic.
Before figuring out what Google Analytics can do, you need to have a Google Analytics account and data flowing from your website.
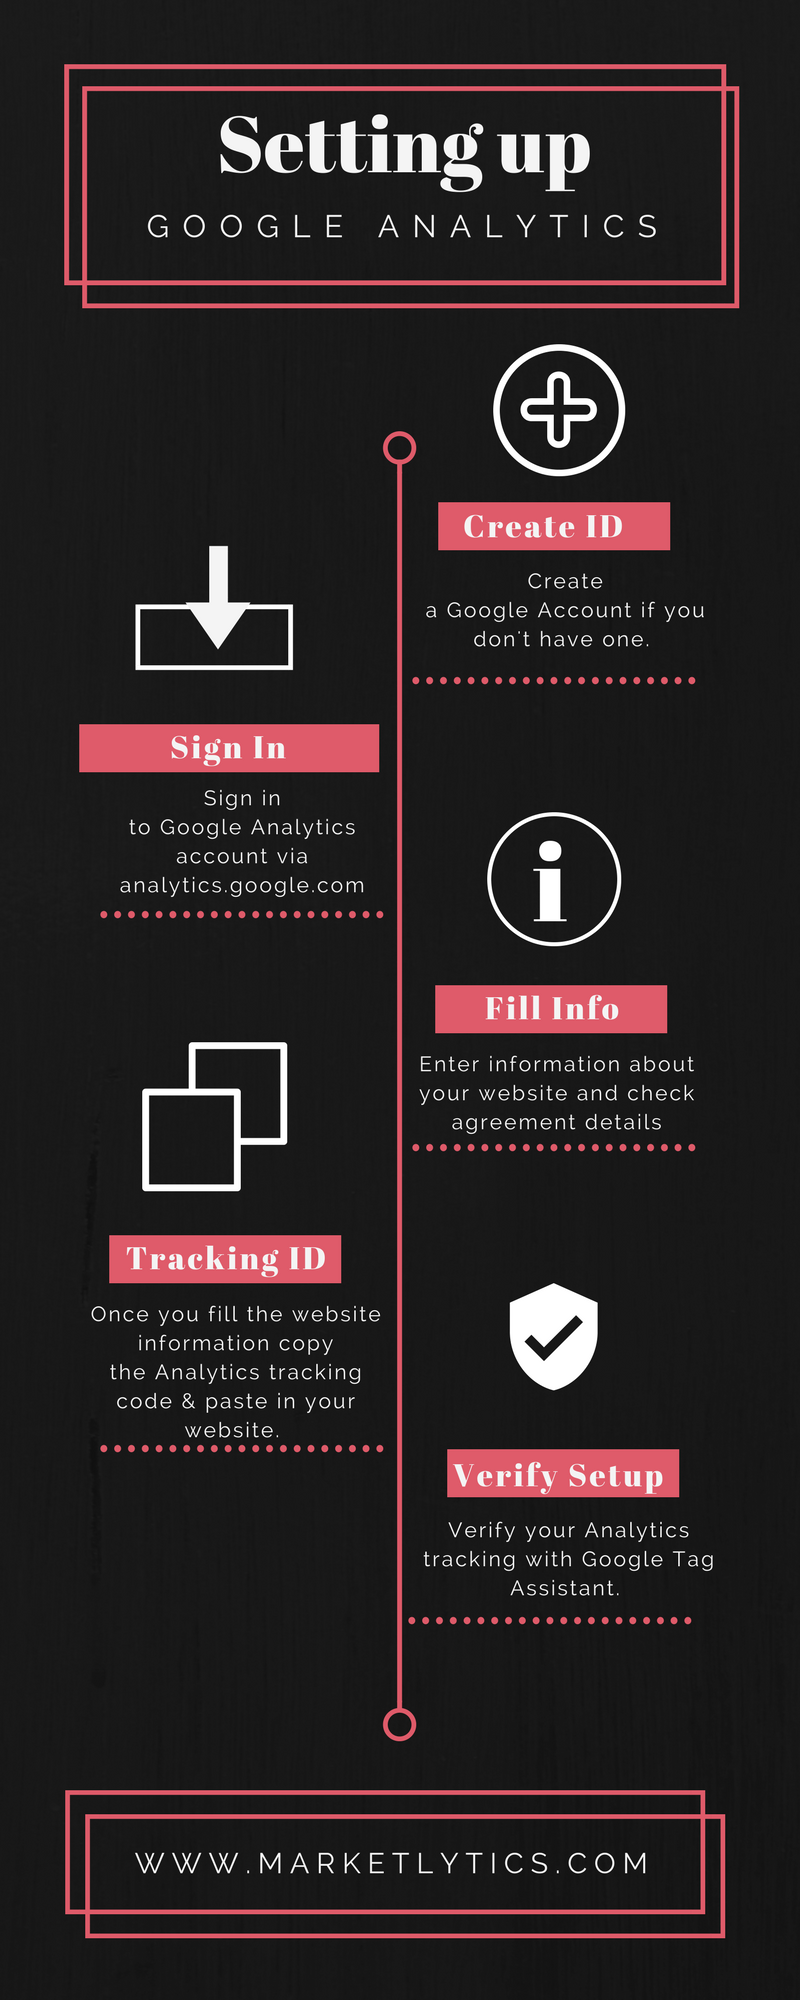
1. Setting up Google Analytics
The Google Analytics installation process includes the following steps.
- Create a Google account if you don’t have one (Gmail ID)
- Sign in to Google Analytics
- Enter your website information
- Get the tracking ID
- Paste into your website
Whether you are using a WordPress site or Shopify store, go through the step-by-step guide to install Google Analytics.
2. Set up goals
Once the GA setup is complete, the next most important step is to set up goals.
Goals in Google Analytics determine the number of visitors performing specified actions. There are four types of Goals.
- Destination: A Goal is recorded when a visitor arrives on a certain page after completing a specific task (e.g thank you page appears after a newsletter signup or after a purchase is completed).
- Duration: Records a Goal when a visitors stays on your site for a specific time duration.
- Pages/Screens Per Session: Records a Goal when a user views a specific number of pages in a single visit.
- Event: Records a Goal when a user completes a specific activity.
You can further customize any Goal to get more extensive reports. Again, your Goals will vary drastically according to your business objectives, so be very careful in determining which activities qualify as ‘Goal’ for your website.
3. Link Search Console with Google Analytics
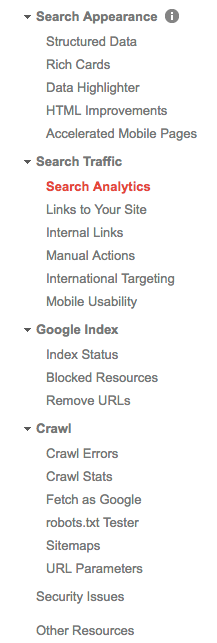
Google Search Console contains a substantial amount of data related to your website’s performance. This is for every website owner, regardless of their industry, background, or the nature of their business. It contains data related to your website’s search appearance, search traffic, Google index, crawling stats, and security issues.
It can be an arduous chore to switch from Analytics to Search Console to collect all the necessary website data. Fortunately, you can now see the Search Console data in a synced Analytics account.
The Search Console data is empty unless you link your Analytics account with it. There are a few steps to send the Search Console data to Analytics.
- Verify your website with Google Search Console (if not done)
- Login to your Google Analytics account
- Navigate to “Admin” and select the property that you want to connect with the Search Console.
- Click on “Property Settings,” scroll down, and click on the “Adjust Search Console” button.
- Inside the Search Console settings, click on the “Edit” button and select your website from the Search Console.
- Within the Search Console settings, select the reporting view in which you want to see the Search Console data.
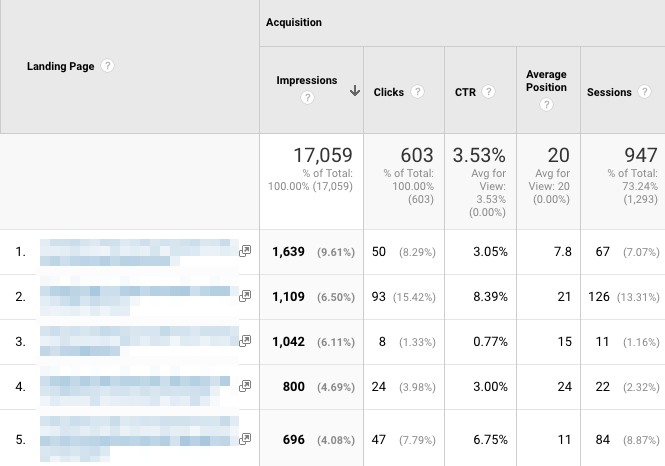
If you finish the process successfully, the Search Console data will start flowing into your Analytics account. You would be able to see the data (Acquisition >> Search Console) within the next 24-48 hours.
What you can do with search console data?
Search Console data is the fuel to sky rocket your online business. Using Search Console data you can:
- Check the performance of each website page on search results
- Get a big list of long tail keywords for which to optimize your webpages
- Compare search engine performance on different devices (i.e mobile, desktop, tablet)
- Check search results across different countries
- Improve your site’s bounce rate based on a long list of keywords
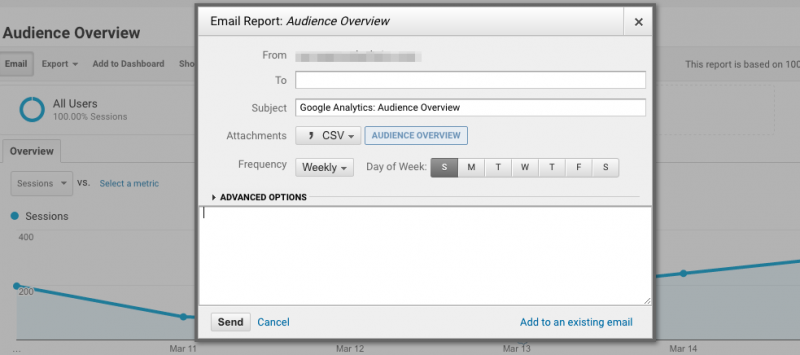
4. Set up automatic email for daily updates
Now that you have configured website Search Console data with Google Analytics, it’s time to browse Google Analytics features and see real time data.
Most business owners don’t have enough time to go though the reports on daily basis. Here comes the Google Analytics email feature, which can send important reports of your choice to your inbox.
Select the reports that are important to your business (enough to be promptly notified) and set up an automatic email on daily, weekly, monthly, or quarterly basis.
Google Analytics doesn’t end there. This was just a glance of few important features. If you are interested to learn more about Google Analytics, you can register yourself with Google Analytics Academy for free.
2 Responses to Get Started With Google Analytics in 4 Easy Steps