
Many people are afraid of Google’s seemingly “big brother” approach to the web. Google appears to keep digging their hands further and further into our lives, collecting data and using in ways that some may not trust as being completely benevolent. While I have some concerns about Google’s approach to collecting data from our websites, I’m also a big fan some of the tools Google offers web developers and site managers.
Google Webmaster Tools is one of the tools that I really like and which can be very helpful to site owners and webmasters to figure out what problems their site has, fix potential errors, and provide Google some feedback on how our sites should be treated. For the most part, the information provided to webmasters through Webmaster Tools is stuff that Google already knows. They collect this data whenever they crawl your website. Webmaster Tools just provides a way for us to see our website through Google-tinted glasses.
![]()
Essentially, Webmaster tools provides you with a window into the soul of your website, and gives you an opportunity to make your site more search engine friendly.
This series of articles will cover setting up your site in webmaster tools and the four main sections provided to analyze and review site issues.
- Part I: Setting Up a Site
- Part II: Site configuration
- Part III: Your site on the web
- Part IV: Your site on the web (continued)
- Part V: Diagnostics
- Part VI: Labs
Setting Up a Site
To use Google’s Webmaster Tools, you first need to have a Google account. Once you have your Google account set up then simply login and go to the Webmaster Tools home page.
Here you can add as many websites as you are currently managing.
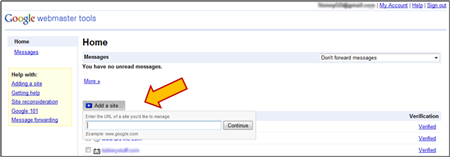
I like to add both the www. version and non-www. version of the site’s URL. This ensures that I get all the relevant stats for the site in questions, as you can often get different results between the two URLs.
Verify Ownership
Once you’ve added your site(s) you’ll be given the opportunity to verify that you are the owner/manager of that site. There are two ways to verify.
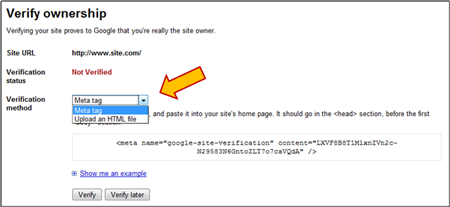
1) File Upload: Google will give you an .html file that you can upload to your root directory.
2) Meta Tag: Google will give you a meta tag that you place between the < head > < /head > tags of your home page.
Select which method you prefer, add or upload the required information, then come back to Webmaster tools and hit “verify”.
You also have the option of adding “owners” or users to the site by going back to the home page and clicking the appropriate link on the far right. Then click “Add a user” and add the Google account email address of the person you want to include.
When Google confirms that the information is in place you’re all set. You’ll want to keep that file or meta tag in place because Google will occasionally go back to re-verify it’s still there. If it’s not then you lose your access to this website in Webmaster Tools. Not to worry, though, you can get access by re-uploading the data again.
Dashboard

When you click into your site from the Webmaster Tools home page you’re taken to that site’s dashboard. From here you can get a quick overview of your site stats, yada yada, yada. You need to click on the navigation on the left (or the “more” links) to get to the full details.
We’ll go into each of these areas over the next five posts in this series. But for now, get your site set up and start browsing around.
Learn more about these sections of Google Webmaster Tools
- Part I: Setting Up a Site
- Part II: Site configuration
- Part III: Your site on the web
- Part IV: Your site on the web (continued)
- Part V: Diagnostics
- Part VI: Labs
Pingback: SEO With Google Webmaster Tools – Part 2: Site Configuration » (EMP) E-Marketing Performance
Pingback: SEO With Google Webmaster Tools – Part 3: Your Site on the Web » (EMP) E-Marketing Performance
Pingback: SEO With Google Webmaster Tools – Part 4: Your Site on the Web (Continued) » (EMP) E-Marketing Performance