
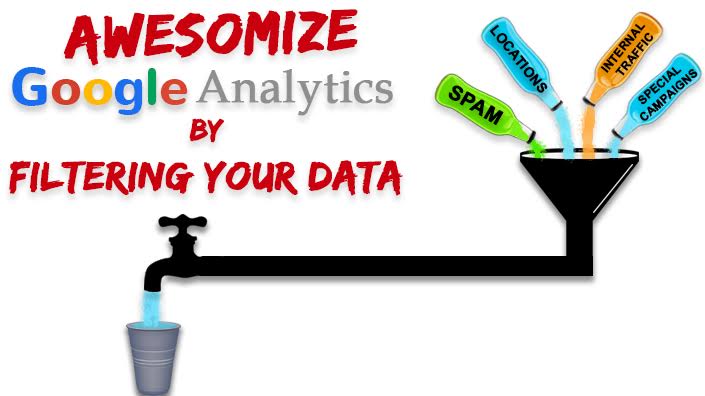
Welcome to Part III of awesomizing your Google Analytics account! If you haven’t already, make sure you go back and check out Part I and Part II before implementing what’s in this post. It will save you some trouble because awesomization (awesome + customization) is a process. But once you have a great account structure and you’re collecting valuable data that’s specific to your website, you’ll want to filter out some data that comes into your reports after you install the standard global analytics tracking code.
 The tracking code isn’t partial. It just does what it does. Therefore, it’s going to collect all of the data it can when it fires — whether you want all of it or not. Chances are, you don’t want all of it, so it’s good to have what you don’t want taken out of your reports so you don’t come to false conclusions regarding what you observe. This will happen if you’re unaware that your data was polluted by something you didn’t want there.
[inlinetweet prefix=”” tweeter=”” suffix=””]Here are some popular types of data that many businesses want filtered out of their Google Analytics accounts[/inlinetweet] (or specific views within their accounts). Read through them and consider what might be appropriate specifically for you.
Exclude Data
Think about data that may not be valuable to have included in your reports and consider filtering it out. Here are some popular examples of common filters that exclude data:
Exclude internal company traffic
You should always have a view in your account where the internal company traffic to your site is filtered out. You don’t want it mixed in with your user data when analyzing your site performance for marketing purposes. If seeing that data IS important for your business, you can always set up another view in your account that includes that traffic only.
Eliminate specific locations
Get a lot of pesky leads from a foreign country that are very low value and are inflating your true lead numbers? Just eliminate traffic that comes from there. Sell a product that’s not licensed in a specific state? Get rid of visits from there.
Exclude all query parameters from URLs
This is one of my favorites because having separate URLs showing in reports just because the URL had a unique order ID attached to it, or a unique search, or the user chose a different color of the product is just annoying. They’re all the same page. Excluding the query parameters will make it so.
Get rid of referrer spam
If you see weird looking websites in your referrer traffic reports that cause your data to be artificially inflated, it’s likely they’re fake referrals. Spammers have figured out how to mess with your Google Analytics data to try to get you to visit their websites and purchase something from them. One of the ways you can get rid of some of them is to create an include filter with only the appropriate hostnames for people visiting your site. If the referrer didn’t actually send a visit to your site, the fake visit will get filtered out.
[Update: That’s only one of the ways. Here’s a more comprehensive look at excluding referrer spam.]
Also note that there are some referrers that will visit your site. For those, you can use the Referral Exclusion List setting under Property > Tracking Info. Combining these two together should get rid of the spam data in your reports.
Include Data
Focus on specific subdomains or directories
Many times, different members of different departments within a company aren’t concerned with the data from the whole website. They’re only concerned with what they’re responsible for. For example, a social media manager might only care about what’s going on with the /blog portion of the website. You can create a view with only data from your blog for them.
Focus on specific campaigns
It may be the case that you have certain people that should have access to data on certain campaigns and certain people that should not. For example, if you’re working with an outside agency on a particular part of your business, you may want them to see what’s going on with that part, but not with other campaigns that they’re not a part of. In this case, you could create a view that only includes data for what they’re working on and give them access to that view only.
Focus on specific locations
Almost all businesses have specific locations they serve, or at least care more about. If that’s the case, it can help to have a view that only shows data for continents, countries, regions (states) or cities that you care most about.
Focus solely on mobile
Mobile is the rage. Want to analyze what’s going on there all by itself? Want to see what content they consume, what actions they take, etc.? Include mobile visitors only in a view and learn the answers more easily.
Change Data
Convert dynamic page URLs into readable text strings
Let’s say you have specific ways to identify products and their pages on your site by numbers. There’s product 1000, 1001, 1002, etc. But when you go to analyze your data, you have to translate those numbers into the actual products they represent. With a search-and-replace filter, you can show the names of items instead of their ID numbers.
Create uniformity among attributes that are the same
I see this one all the time. A business sends an email newsletter, and they tag the medium as email part of the time and Email the rest of the time! Ugh. When you go to analyze the data, you have to consolidate them into one. With a case filter, you can make sure both of these come through as one or the other. You may see this with URIs as well. For example, /ThankYou.html and /thankyou.html. They’re the same page. You want them to be the same page in your reports, too.
Make all email sources the same
If you send email newsletters, you may see incoming visits by different types of webmail services (mail.aol.com, mail.yahoo.com, etc.). Clearly, that’s not useful. You can consolidate them all into a single source so that you can more easily analyze traffic that came from emails.
Pay attention to filter order
Filters are applied in the order in which they are found in your configuration settings. This means that the data passes through one filter at a time from first to last. You want to make sure you review what this leaves you with after the data has passed through all the filters and comes out on the other end. You don’t want to be left with the wrong data while you’re assuming it’s the right data. So make sure you map out step by step the inputs and outputs as each filter is applied.
Think about how they’ll be used
When creating filters, always ask yourself “Will I be using this filter in multiple views?” If yes, then you can create the filter at the account level and then apply it to more than one view. If not, you can create it at the specific view level so that it will never be mistakenly applied to another view.
Verifying your filters
When you set up a filter, it starts applying to your data right away, but you may not see its affects for up to 24 hours. If you should happen to make a mistake, the data during the time period the filter was applied will be inaccurate. To avoid this, it helps to do two things. First, verify your filters in the present moment by using the “verify this filter” link before you hit save on your new filter. For some filters, this will show you a before and after table of the data you are trying to filter so you can see if it makes sense. Second, make sure to apply your filter configuration to a test view first to confirm that it works the way you want it to. Once your view has collected data and you’ve confirmed your filter works the way you want it to, then you can apply it to the appropriate view.
Another way to verify any filters that include attributes that apply to you at the time you create them is to use real-time reports. Open two different browsers – one with your Google Analytics real-time reports loaded and one with your website loaded. On the end of your website URL, append &source=test&medium=test. When you go to real-time reports in GA, you will either see yourself (or not see yourself) in the reports (depending on if your filter is include or exclude) to confirm if it’s working.
Add annotations
Make sure you remember to take notes about when you applied every filter to your data. Filters are not applied retroactively, so you don’t want to end up in a situation where you’re comparing data from before and after a filter was applied to it.
The purpose of this post is to help you think more deeply about your data organization and quality. Use it to consider if you should work more with your account to make your data easier to report and analyze. It’s all about finding insights that can help your business improve, and if your data isn’t clean and organized, you’ll have a much harder time doing that.
3 Responses to Awesomize Google Analytics (Part III) – Filter Your Data